확실히 쓰면서 이해하니까 어지러운 와중에도 머리속에 들어오는 것 같다.
사전 설정
1. json-server설치 및 서버가동 (db.json)
{
  "todos": []
}
2. Slice로 todos 모듈 추가 구현 (이전 챕터에서 작성했던 todos 모듈 뼈대)
// src/redux/modules/todosSlice.js

import { createSlice } from "@reduxjs/toolkit";

const initialState = {
  todos: [],
};

export const todosSlice = createSlice({
  name: "todos",
  initialState,
  reducers: {},
});

export const {} = todosSlice.actions;
export default todosSlice.reducer;
3. configStore에서 리듀서 추가.
// src/redux/config/configStore.js

import { configureStore } from "@reduxjs/toolkit";
/**
 * import 해온 것은 slice.reducer 입니다.
 */
import counter from "../modules/counterSlice";
import todos from "../modules/todosSlice";

/**
 * 모듈(Slice)이 여러개인 경우
 * 추가할때마다 reducer 안에 각 모듈의 slice.reducer를 추가해줘야 합니다.
 *
 * 아래 예시는 하나의 프로젝트 안에서 counter 기능과 todos 기능이 모두 있고,
 * 이것을 각각 모듈로 구현한 다음에 아래 코드로 2개의 모듈을 스토어에 연결해준 것 입니다.
 */
const store = configureStore({
  reducer: { counter: counter, todos: todos },
});

export default store;
구현순서
1. thunk 함수 구현 --> __getTodos()
2. 리듀서 로직 구현
- extraReducers 사용 : reducers에서 바로 구현되지 않는 기타 Reducer 로직을 구현할 때 사용하는 기능입니다.보통 thunk 함수를 사용할 때 extraReducers를 사용합니다.
- [중요 🔥] 통신 진행중, 실패, 성공에 대한 케이스를 모두 상태로 관리하는 로직을 구현합니다. 서버와의 통신은 100% 성공하는 것이 아닙니다. 서버와 통신을 실패했을때도 우리의 서비스가 어떻게 동작할지 우리는 구현해야 합니다. 또한 서버와의 통신은 ‘과정' 입니다. 그래서 서버와 통신을 진행하고 있는 ‘진행중' 상태일때 우리의 서비스가 어떻게 작동해야할지 마찬가지로 구현해야 합니다.
3. 기능확인
- devtools 이용해서 작동 확인
4. Store값 조회하고, 화면에 렌더링하기
1) Thunk 함수 구현 --> 서버에서 데이터 가져오기
먼저 initialState를 봅시다.
isLoading은 서버에서 todos를 가져오는 상태를 나타내는 값입니다. 초기값은 false이고, 서버와 통신이 시작되면 true였다가 통신이 끝나면 다시 false로 변경됩니다.
error는 만약 서버와의 통신이 실패한 경우 서버에서 어떤 에러 메시지를 보내줄텐데, 그것을 담아놓는 값입니다. 초기에는 에러가 없기 때문에 null로 지정했습니다.
대부분 서버와의 통신을 상태관리 할 때는 data, isLoading, error로 관리합니다.
// src/redux/modules/todosSlice.js

import { createAsyncThunk, createSlice } from "@reduxjs/toolkit";

const initialState = {
  todos: [],
  isLoading: false,
  error: null,
};

// 우리가 추가한 Thunk 함수
export const __getTodos = createAsyncThunk(
  "getTodos",
  (payload, thunkAPI) => {}
);

export const todosSlice = createSlice({
  name: "todos",
  initialState,
  reducers: {},
  extraReducers: {}, // 새롭게 사용할 extraReducers를 꺼내볼까요?
});

export const {} = todosSlice.actions;
export default todosSlice.reducer;
thunk함수를 아래코드와 같이 작성합니다. const data는 Promise를 반환합니다.
다시말해 axios.get()은 Promise를 반환합니다. 그래서 반환된 Promise의 fullfilled또는 rejected된 것을 처리하기 위해 async/ await을 추가했습니다.
그리고 이 요청이 성공하는 경우에 실행되는 부분과 실패했을 때 실행되어야 하는 부분을 나누기 위해 try, catch구문을 사용했습니다.
// src/redux/modules/todosSlice.js

import { createAsyncThunk, createSlice } from "@reduxjs/toolkit";
import axios from "axios";

const initialState = {
  todos: [],
  isLoading: false,
  error: null,
};

// 완성된 Thunk 함수
export const __getTodos = createAsyncThunk(
  "todos/getTodos",
  async (payload, thunkAPI) => {
    try {
      const data = await axios.get("http://localhost:3001/todos");
      console.log(data);
    } catch (error) {
      console.log(error);
    }
  }
);

export const todosSlice = createSlice({
  name: "todos",
  initialState,
  reducers: {},
  extraReducers: {},
});

export const {} = todosSlice.actions;
export default todosSlice.reducer;
App.js에서 확인하기
// src/App.jsx

import React, { useEffect } from "react";
import { useDispatch } from "react-redux";
import { __getTodos } from "./redux/modules/todosSlice";

const App = () => {
  const dispatch = useDispatch();

  useEffect(() => {
    dispatch(__getTodos());
  }, [dispatch]);

  return <div>App</div>;
};

export default App;
컴포넌트가 마운트퇴었을 때 thunk함수를 dispatch하는 코드입니다.
devtools로 보면 json server로부터 데이터를 잘 가져온 것을 볼 수 있고, todo가 비어있어 빈 배열로 표시되어있는 것을 볼 수있으며, dispatch된 action을 잘 보여주고 있음을 알 수 있습니다.
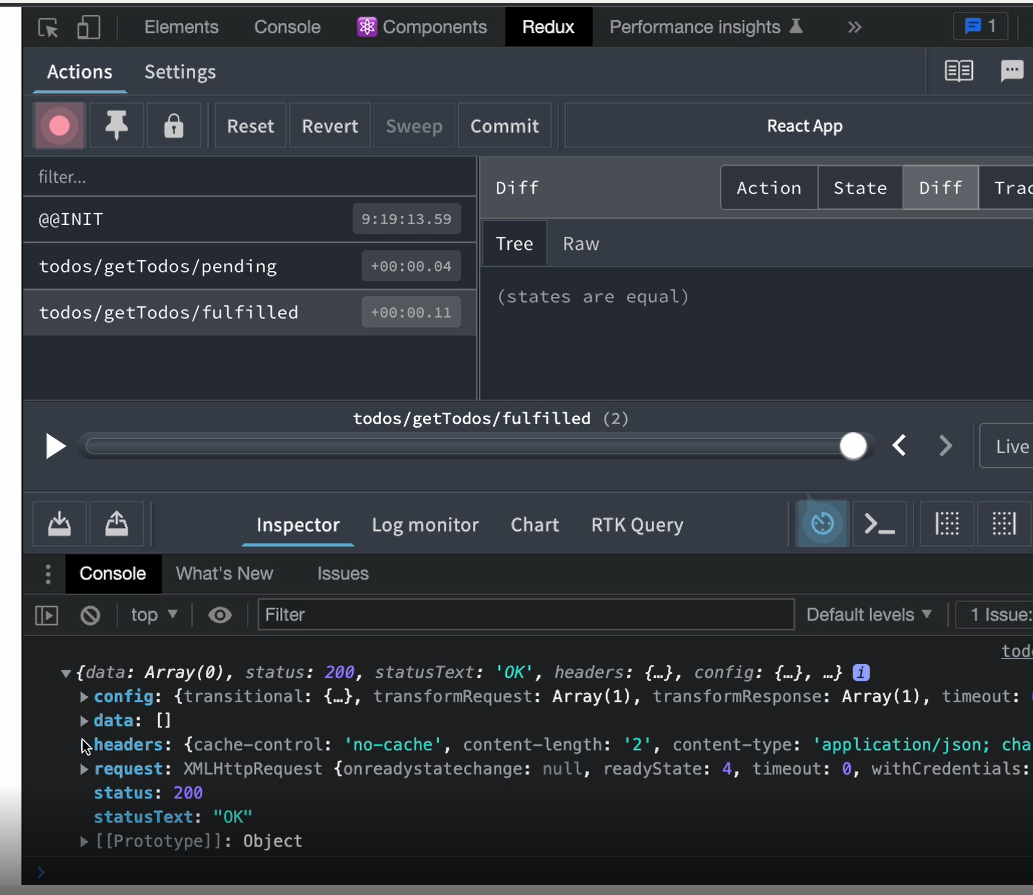
만약 axios.get에 입력한 주소값이 없는 주소라면 fulfilled대신 rejected가 실행되고, 에러가 출력됩니다.
2) Thunk 함수 구현 --> 가져온 데이터 Store로 dispatch하기
fulfillWithValue는 툴킷에서 제공하는 API입니다.
Promise에서 resolve된 경우, 다시말해 네트워크 요청이 성공한 경우에 dispatch해주는 기능을 가진 API입니다. 그리고 인자로는 payload를 넣어줄 수 있습니다.
rejectWithValue도 툴킷에서 제공하는 API입니다. Promise가 reject된 경우, 네트워크 요청이 실패한 경우 dispatch해주는 기능을 가진 API입니다. 마찬가지로 인자로 어떤 값을 넣을 수 있습니다.
여기선 catch에서 잡아주는 error객체를 넣었습니다.
// src/redux/modules/todosSlice.js

import { createAsyncThunk, createSlice } from "@reduxjs/toolkit";
import axios from "axios";

const initialState = {
  todos: [],
  isLoading: false,
  error: null,
};

export const __getTodos = createAsyncThunk(
  "todos/getTodos",
  async (payload, thunkAPI) => {
    try {
      const data = await axios.get("http://localhost:3001/todos");
      return thunkAPI.fulfillWithValue(data.data);
    } catch (error) {
      return thunkAPI.rejectWithValue(error);
    }
  }
);

export const todosSlice = createSlice({
  name: "todos",
  initialState,
  reducers: {},
  extraReducers: {},
});

export const {} = todosSlice.actions;
export default todosSlice.reducer;
dispatch라는 것은 리듀서에게 action과 payload를 전달해주는 과정인데 우리는 아직 아무런 리듀서를 작성한 적이없습니다. 따라서 그 리듀서를 구현해봅시다.
3. 리듀서 로직 구현 --> extraReducers
Slice 내부에 있는 extraReducers에서 아래와 같이 pending, fulfilled, rejected에 대해 각각 어떻게 새로운 state를 반환할 것인지 구현할 수 있습니다.
우리가 thunk 함수에서 thunkAPI.fulfillWithValue(data.data)라고 작성하면 [__getTodos.fulfilled]이부분으로 디스패치가 됩니다. 그래서 action을 콘솔에 찍어보면 fulfillWithValue(data.data)가 보낸 액션 객체를 볼 수 있습니다. type와 payload가 있죠!
정리하자면 원래는 우리가 action creator을 만들고, 리듀서에서 스위치문을 통해 구현해줘야 하는 부분을 모두 자동으로 해주고 있는 모습을 보고있는 것입니다.
// src/redux/modules/todosSlice.js

import { createAsyncThunk, createSlice } from "@reduxjs/toolkit";
import axios from "axios";

const initialState = {
  todos: [],
  isLoading: false,
  error: null,
};

export const __getTodos = createAsyncThunk(
  "todos/getTodos",
  async (payload, thunkAPI) => {
    try {
      const data = await axios.get("http://localhost:3001/todos");
      return thunkAPI.fulfillWithValue(data.data);
    } catch (error) {
      return thunkAPI.rejectWithValue(error);
    }
  }
);

export const todosSlice = createSlice({
  name: "todos",
  initialState,
  reducers: {},
  extraReducers: {
    [__getTodos.fulfilled]: (state, action) => {
      console.log("fulfilled 상태", state, action); // Promise가 fullfilled일 때 dispatch
    },
  },
});

export const {} = todosSlice.actions;
export default todosSlice.reducer;
이제 각각의 상태로 thunkAPI가 dispatch해주는 것을 확인했으니, 실제로 리듀서 로직을 구현해봅시다.
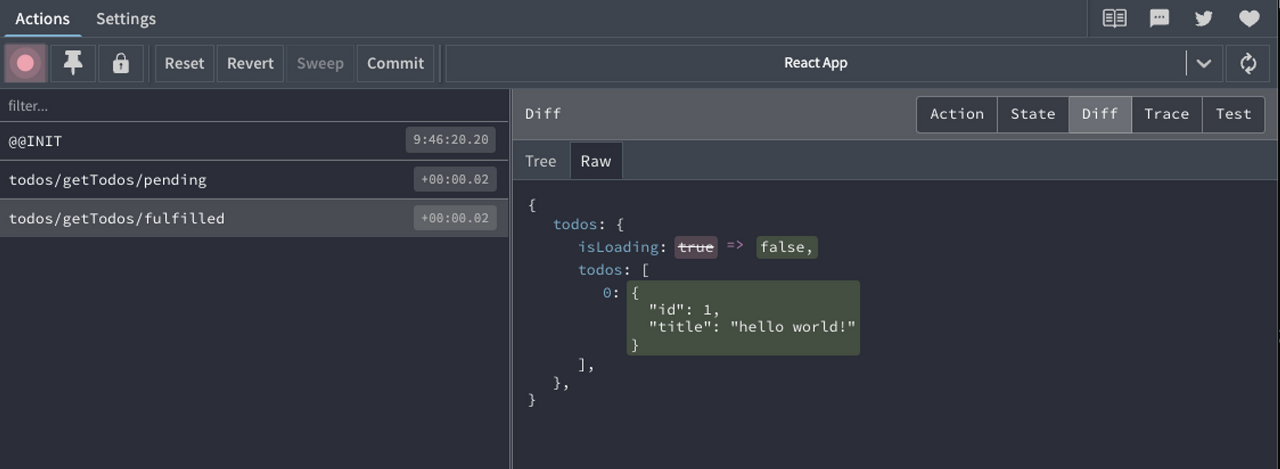
db에 임시 데이터가 없으니 구분하기가 힘듭니다. { "id":1, "title":"hello, world"}라는 테스트 Todo를 추가하고 진행합니다.
아래코드와 같이 extraReducers에 pending와 rejected상태에 따른 리듀서로직을 추가로 구현합니다.
export const todosSlice = createSlice({
  name: "todos",
  initialState,
  reducers: {},
  extraReducers: {
    [__getTodos.pending]: (state) => {
      state.isLoading = true; // 네트워크 요청이 시작되면 로딩상태를 true로 변경합니다.
    },
    [__getTodos.fulfilled]: (state, action) => {
      state.isLoading = false; // 네트워크 요청이 끝났으니, false로 변경합니다.
      state.todos = action.payload; // Store에 있는 todos에 서버에서 가져온 todos를 넣습니다.
    },
    [__getTodos.rejected]: (state, action) => {
      state.isLoading = false; // 에러가 발생했지만, 네트워크 요청이 끝났으니, false로 변경합니다.
      state.error = action.payload; // catch 된 error 객체를 state.error에 넣습니다.
    },
  },
});
기능확인은 devtools에서 확인합니다.
App.js가 마운트 되었을 때 thunk함수가 디스패치되었고, axios에 의해 네트워크 요청이 시작됐습니다.
그래서 todos의 isLoading이 true로 변경된 것을 알 수 있습니다.

네트워크 요청이 끝났고 성공했습니다. 그래서 thunkAPI.fulfillWithValue(data.data)에 의해 생성된 todos/getTodos/fulfilled라는 액션이 dispatch되었고, 그로인해 리듀서에서 새로운 payload를 받아 todos를 업데이트 시켰습니다. 그리고 네트워크가 종료되었으니 isLoading값도 false로 변경되었습니다.
rejected가 된 것을 보고자 한다면, 의도적으로 실패하게 네트워크 요청을 하면 됩니다. 이상한 url로 네트워크 요청을 보내는 겁니다.


5) Store값 조회하고, 화면에 렌더링하기
이제 모든 로직을 구현하였으니 useSelector을 이용해 store값을 조회하고, 화면에 렌더링해봅시다. 상태에따라 구분하여 화면에 다르게 표시하였습니다.
서버에서 데이터를 가져오는 동안에는 로딩중임을 표시하고, 가져오는 것을 실패하면 에러메시지를 보이고, 성공하면 todos를 화면에 보입니다.
// src/App.jsx

import React, { useEffect } from "react";
import { useDispatch, useSelector } from "react-redux";
import { __getTodos } from "./redux/modules/todosSlice";

const App = () => {
  const dispatch = useDispatch();
  const { isLoading, error, todos } = useSelector((state) => state.todos);

  useEffect(() => {
    dispatch(__getTodos());
  }, [dispatch]);

  if (isLoading) {
    return <div>로딩 중....</div>;
  }

  if (error) {
    return <div>{error.message}</div>;
  }

  return (
    <div>
      {todos.map((todo) => (
        <div key={todo.id}>{todo.title}</div>
      ))}
    </div>
  );
};

export default App;
thunk 함수는 Reducers가 아닌 외부에서 작성한 것이므로 extraReducers를 사용해야한다.
thunkAPI를 이용하여 Promise를 다룰 수 있다.
서버에서 가져오는 데이터는 로딩상태, 성공, 실패로 나누어 상태를 관리하고 컴포넌트 단에서도 이에따라 다르게 조건부 렌더링을 한다.
'1차 공부 > React공부' 카테고리의 다른 글
| 스타일드 컴포넌트 공부 (1) | 2023.01.02 |
|---|---|
| thunk가 뭔데 도대체 (0) | 2022.12.13 |
| Axios관련 더 알아보기 (0) | 2022.12.11 |
| Axios (0) | 2022.12.10 |
| json server (0) | 2022.12.10 |